Monday, June 6, 2011

Multiplicity


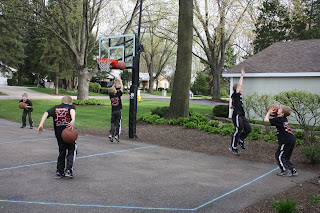
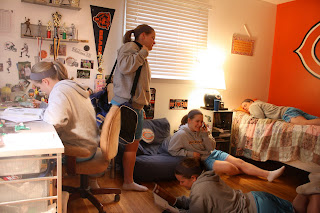
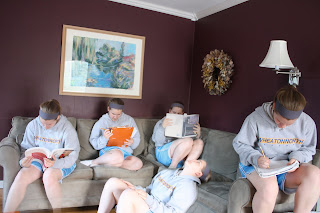
For my multiplicity project I used the Eraser Tool and Move tool to put the pictures together. This project was fun to put together. The Composition and Saturation of the photos was fun to adjust. These were all edited in Photoshop.

Thursday, June 2, 2011

Comic Book


last multiplicity


Night/Bulb


For my project, I used a slow Shutter Speed, and a large Apature to capture the shots at night. I adjusted the Brightnes and Contrast to fix some of the photos as well as the Curves to adjust the lighting.


Wednesday, June 1, 2011

Pano Summary

For my Panography project, I Batched and put together 5 photos. I desaturated them, and distorted them to add to their completeness. Then I flattened the layers to make it one layer, and added a filter.

Pano 2

Multiplicity


Three of four pictures and summary - I have one more picture I will post tomorrow


Multiplicity was all about masking and working with a lot of layers. Also, editing the exposure helped make it look real, and the contrast as well. There was no cropping involved because the picture was already set up, all you had to do was use the brush tool.


Portrait Summary

For my portraits I did a lot of masking. I destaturated some photos to make them look better. I used the cross-processing tutorial on one of my photos. I had to change the exposure and contrast on some pictures. In this project, I also learned about shooting in the studio with the lights.

Tuesday, May 31, 2011

Multiplicity


For this multiplicity project i tried focusing mostly on balance. I also needed to focus on the lighting, brightness, and contrast becuase your putting more than one picture together but they need to look the same. I like this project a lot and thought it was a great composition.


Tuesday, May 24, 2011

Multiplicity Summary

For the mulitplicity shots, there was a lot of work with the quick selection tool in order to fit all of the objects or people into one shot. I worked with the contrast in all of my photos alot in order to get the right look and I made sure to crop for better composition. Also, some of the shots I desaturated in order for the multiple objects to stand out. It was important to make sure that when you shot this project, your camera angle stayed the same throughout all the photos.

Colors Tutorial


Portrait Summary

To add Composition to my photos for this project, I Desaturated them, adjusted the Curves and Brightness/Contrast. These photos were the base for my editorial shoot... For the editing the Healing Brush Tool really helped to get rid of unwanted spots or discolorations.

Pip's Experimentals


Thursday, May 19, 2011

Experimentals

Gritty Overproccessed: Gaussian Blur:

Radial Blur:


Solarization:


Double Negative:


For my experimental images I tried to have a good composition by following the rule of thirds and use color creativly. I also wanted to convey texture and have a strong contrast in each image.

Multiples


In my multiples project i tried to use an odd amount of numbers so it will look more interesting in my composition. I also lowered the opacity and made a higher contrast to make it look dream like. Finally for my doll photos I used a higher saturation so it would look like a childrens play land.